Fifty years of service leaves a mark on any electrical system. When you’re considering an Early Bronco purchase or restoration, the wiring harness isn’t immediately visible—but it determines whether your build delivers the driving experience you expect.
The original 1966-1977 Ford Bronco wiring was designed for a different era. A simple powertrain, basic lighting, minimal accessories. The system worked when new, but decades of exposure and the natural evolution to modern features create an opportunity to elevate the entire electrical foundation.
This guide covers Early Bronco wiring harness replacement with real costs, clear options, and a straightforward path to deciding between DIY and professional installation.
Why 50-Year-Old Wiring Deserves Attention
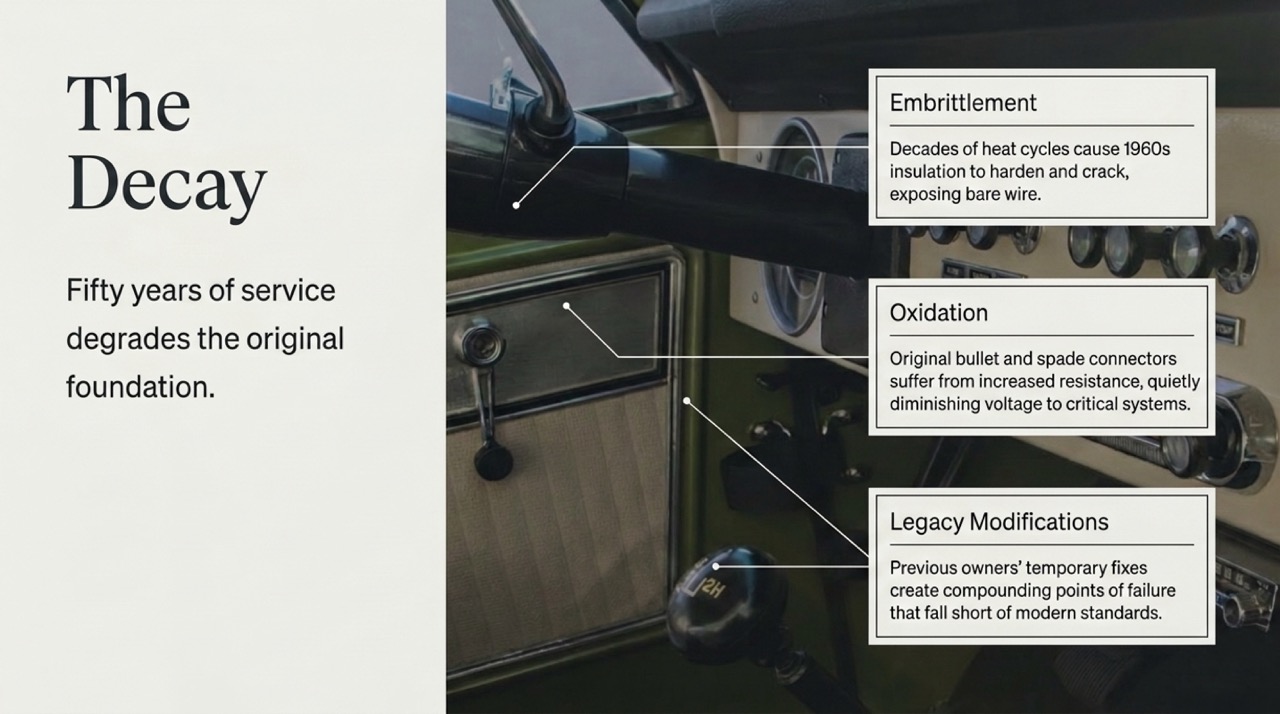
Original insulation materials from the 1960s and 70s weren’t engineered for half a century of service. Heat cycles in engine bays and under dashboards cause insulation to become brittle. One connection fails and you’re working through a bundle of aging wires.
Oxidation at connection points quietly diminishes performance. The original spade connectors, bullet connectors, and ground points weren’t designed to last decades. Resistance increases at these points, which means reduced voltage where it matters most—fuel pumps, ignition systems, headlights. Performance issues that seem drivable often trace back to electrical connections.
Previous owners made modifications based on what was available at the time. Wiring for aftermarket accessories often involved connections that don’t meet today’s standards. These modifications don’t necessarily present immediate problems, but they create an opportunity for improvement when you’re ready to elevate the system.
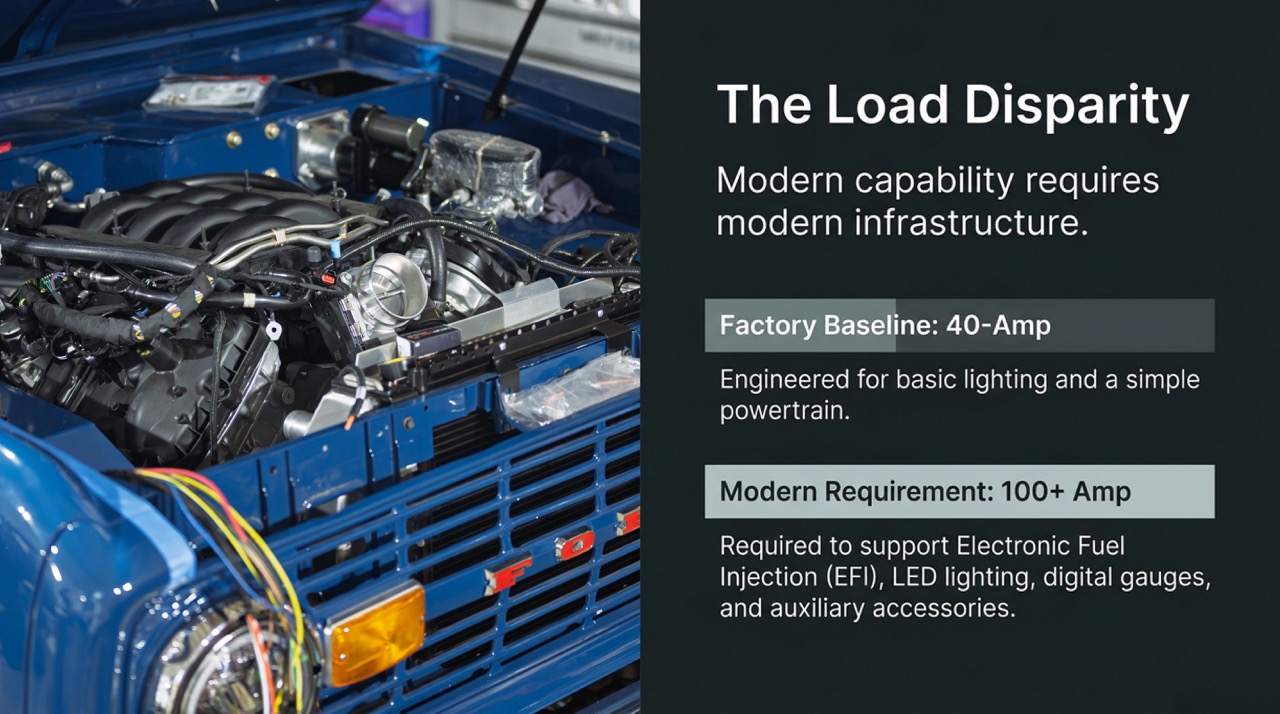
Modern accessories exceed the original design parameters. LED headlights, electronic fuel injection, modern gauges, phone charging, winches, onboard air—these additions represent capability that the original charging system and wiring harness weren’t engineered to support. You can work within the existing framework, or you can build an electrical system that matches your vision for the truck.
Understanding Your Options: Repair vs Replace vs Full Rewire
Your approach depends on your current situation and your plans. Not every Early Bronco needs a complete rewire, and understanding the options helps you invest where it matters.
Spot repairs address isolated situations. If you have a single circuit issue or a specific ground point needing attention, targeted repair delivers results efficiently. You address the specific area and move forward. The consideration is that once you’re working through a vintage system, you’re rarely dealing with just one area. Fifty-year-old wiring tends to benefit from comprehensive attention.
Harness section replacement works when one area requires focus. The engine bay harness often experiences the most demanding conditions, and vendors offer replacement sections specifically for this area. Under-dash harnesses can also be replaced independently. This approach costs less than a full rewire while addressing the most critical sections. The trade-off is mating old wire to new, which creates new connection points.
Complete rewire with modern kits represents the comprehensive solution. You remove the original wiring and install a full system with contemporary components, proper fusing, and circuits designed for modern use. This is the right choice if you’re doing a frame-off restoration, planning significant powertrain upgrades, or want reliability that matches the rest of your build. It’s also the most substantial investment in parts and labor.
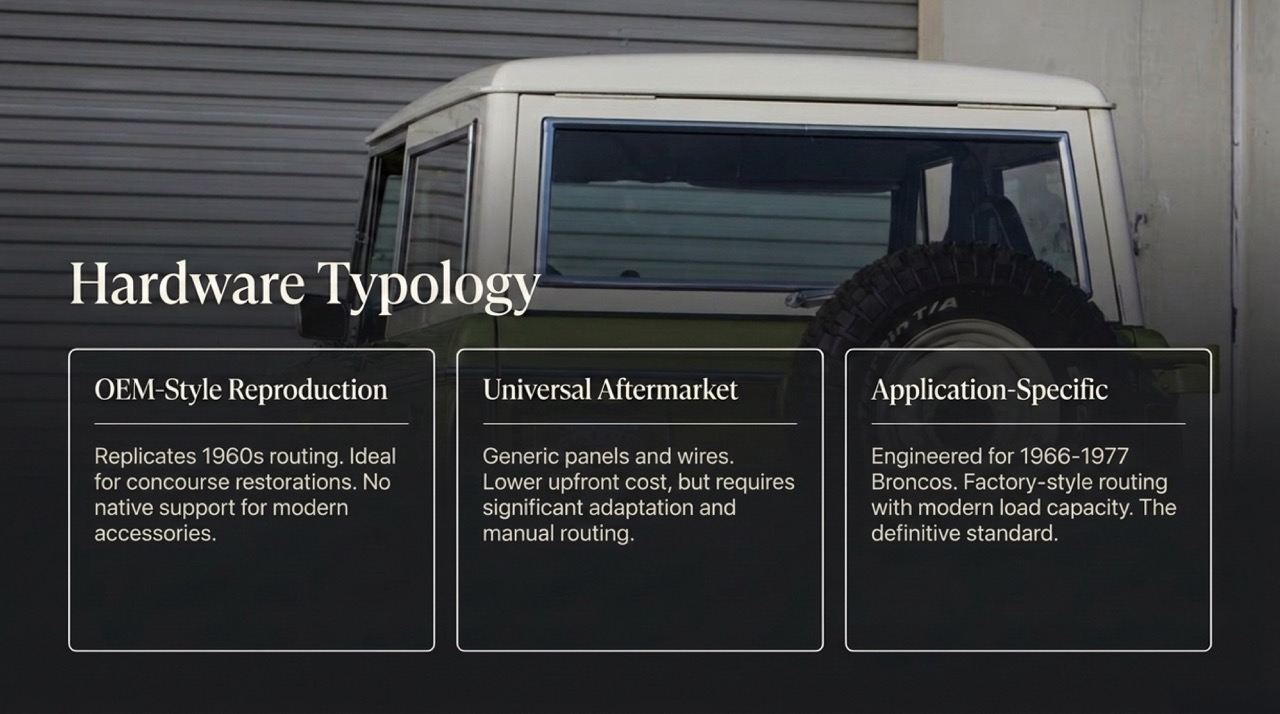
OEM-style reproduction harnesses replicate the original Ford routing and appearance. These appeal to restorers prioritizing factory correctness, though they don’t address the capabilities of modern components. Aftermarket universal kits offer more modern features but require significant adaptation to fit an Early Bronco’s specific layout. Application-specific kits designed for Early Broncos balance original appearance with modern reliability.
Early Bronco Wiring Harness Cost Breakdown
Wiring costs vary based on your approach, scope of work, and whether you’re handling installation or engaging professionals.
Parts Costs
Basic rewire kits start around $600-$800 for fundamental wiring replacement. These typically include the main harness, fuse panel, and basic circuits. Mid-range kits with quality components, more circuits, and improved documentation run $900-$1,200. Premium kits with extensive accessory circuits, upgraded fuse panels, and comprehensive instructions reach $1,200-$1,500+.
American Autowire’s complete kit for Early Broncos runs approximately $1,091. This includes color-coded wiring, a modern fuse panel, and circuits designed specifically for Early Broncos. Wild Horses 4×4 and Bronco Graveyard offer similar options in comparable price ranges.
Additional components to consider: relays for high-draw circuits ($50-$150), upgraded fuse panel if not included ($80-$200), connectors and terminals ($50-$100), proper wiring tools if you don’t own them ($100-$300), and replacement switches if originals are worn ($200-$500+ depending on scope).
Labor Costs
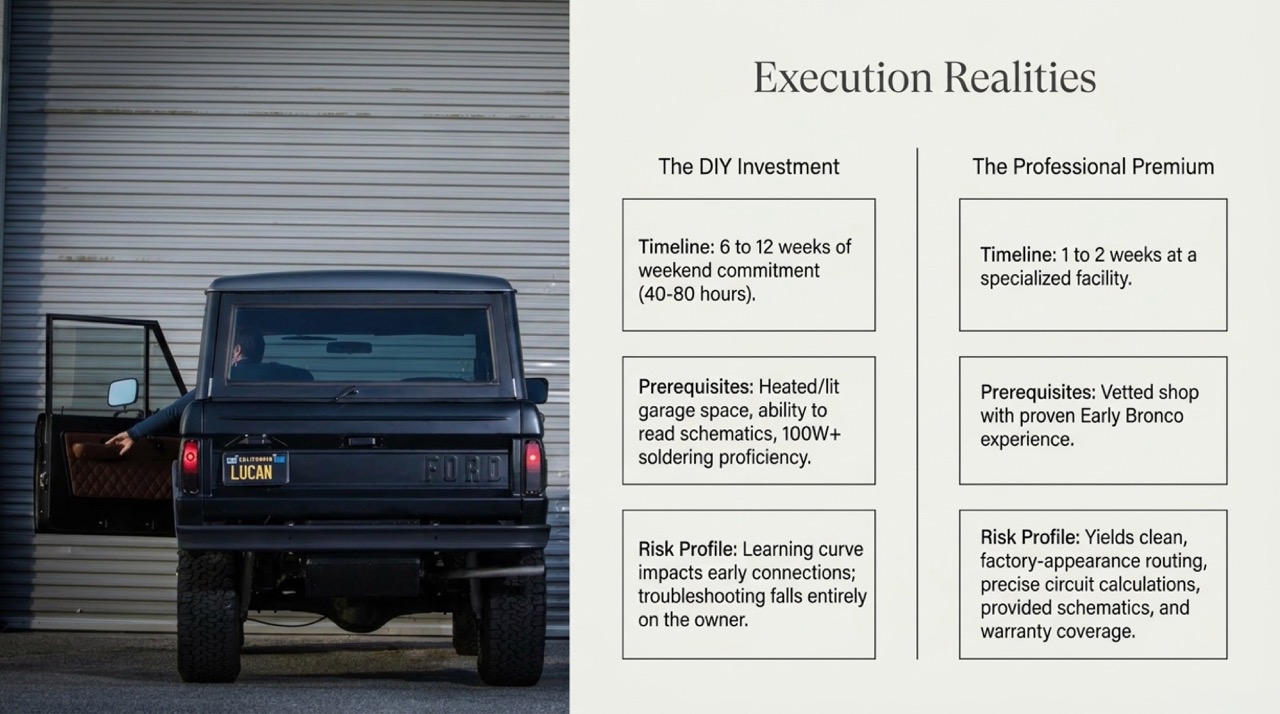
DIY installation saves labor costs but requires time investment. Realistically budget 40-80 hours for a first-time complete rewire working weekends and evenings. Experienced DIYers might complete it in 25-40 hours. The learning curve is real—your first connections take time, your efficiency improves with experience.
Professional installation costs vary by region and shop expertise. Basic shops typically charge $80-$120/hour, while specialists with vintage vehicle experience may command $120-$180/hour. Complete rewire labor generally falls between $1,000 and $3,000, with complex builds or extensive accessory integration representing higher investment.
Forum discussions indicate total costs ranging from $800 on the lower end (DIY with basic kit, limited accessories) to $5,000+ for professional installation with premium kit and comprehensive modernization. One forum member reported a frame-off rewire taking 4 months and costing $4,500 for a CJ5, which provides context for complexity on the upper end.
Budget Worksheet
| Item | DIY Range | Professional Range |
|---|---|---|
| Basic rewire kit | $600-$900 | $600-$900 |
| Premium rewire kit | $1,000-$1,500 | $1,000-$1,500 |
| Relays & fuse panel | $100-$250 | $100-$250 |
| Connectors & terminals | $50-$150 | $50-$150 |
| Tools (if needed) | $100-$300 | $0 |
| Labor | $0 | $1,000-$3,500 |
| Total | $850-$2,600 | $1,750-$6,300 |
Your actual investment falls between these ranges based on kit selection, accessory complexity, and installation approach.
Top Wiring Harness Kits for Early Broncos
Several quality options exist, and choosing the right one depends on your specific needs and future plans.
American Autowire is widely recognized as the premium option for Early Broncos. Their complete rewire kit includes a factory-style fuse panel, color-coded wiring that follows original conventions where possible, and extensive documentation. The kit is designed specifically for 1966-1977 Broncos, meaning you’re installing a purpose-built system rather than adapting a universal solution. American Autowire circuits accommodate modern accessory loads, which matters if you’re planning EFI, high-output lighting, or sound systems.
Wild Horses 4×4 offers both American Autowire kits and their own branded options. Their focus on Early Broncos means they understand the specific routing challenges and provide guidance through their technical support. The American Autowire Master Kit they stock includes the deluxe fuse panel and is noted for reliability and installation straightforwardness.
Bronco Graveyard provides multiple harness options, including American Autowire systems and specialized harnesses for specific applications like power tailgate add-ons. Their expertise in Early Broncos helps match you with the right kit based on your year, model, and planned modifications.
When evaluating kits, look for: application-specific design rather than universal adaptation, adequate circuit count for your planned accessories, modern fuse panel with proper fusing, color-coded wiring that matches schematics, and responsive technical support. The least expensive option often costs more over time when you’re working around poor instructions or inadequate circuit capacity.
DIY Early Bronco Wiring: Skills Required and Time Investment
Tackling your own rewire is achievable if you have the right combination of skills, patience, and workspace. Many Early Bronco owners successfully complete this project and develop valuable electrical knowledge in the process.
Required Tools and Workspace
You’ll need more than basic hand tools. Quality wire strippers that won’t nick conductors, a capable soldering iron (100W or higher for automotive wiring), heat shrink tubing in various sizes, a good multimeter, and proper crimping tools are essentials. A wire-labeling system or masking tape and marker helps considerably during installation. You’ll also need basic automotive tools for removing dashes, steering columns, and interior panels to access wiring runs.
Workspace requirements matter more than many anticipate. You need clean, well-lit space where you can leave the vehicle partially disassembled for weeks or months. A garage provides the ideal environment—working outside exposes components to weather and makes organization difficult. You’ll need space to lay out the new harness and compare it to vehicle routing. A workbench for organizing connectors and preparing circuits before installation saves significant time.
Technical Skills
Reading electrical schematics is essential. Most quality kits include diagrams, but you need to understand how to translate those diagrams to actual vehicle wiring. Basic soldering skills are required—proper solder joints ensure reliability. Understanding appropriate wire gauge selection, circuit protection, and grounding principles matters. You’ll be testing circuits, troubleshooting connections that don’t work initially, and making decisions about routing and protection.
Assess your comfort level with electrical work realistically. If you’ve successfully wired automotive accessories, installed stereos, or handled basic electrical repairs, you’re likely capable. If your experience is limited to changing light bulbs, a full rewire might be an ambitious first electrical project.
Realistic Timeline Estimates
First-time rewire projects done on weekends typically span 6-12 weeks. You’ll spend the first weekend removing the old harness and documenting routing, another weekend or two preparing the new harness and mounting components, then several weekends running wires and making connections. Allow additional time for troubleshooting when circuits don’t function initially—adjustments are part of the process.
Experienced DIYers comfortable with electrical work might complete the project in 2-4 weeks of focused effort. The actual hands-on time might be 30-50 hours, but other commitments tend to interrupt weekend projects.
Common considerations include not labeling wires before removal, which makes reinstalling original switches challenging; rushing connections that require careful soldering; inadequate wire protection through body openings; and minimal ground planning that creates situations requiring attention later. Taking your time during initial work saves hours of troubleshooting later.
Professional Installation: What to Expect
Engaging professionals makes sense if you value your time, prefer established electrical expertise, or are already investing in a comprehensive restoration. Understanding what to expect helps you choose the right shop and manage the process effectively.
Finding Qualified Shops
Not every restoration shop handles electrical work with equal capability. Look for shops with demonstrated Early Bronco experience—ask to see examples of their wiring work. Quality wiring should appear almost factory once installed: clean routing, proper protection, neatly bundled and secured runs, accessible fuse panels, and clear labeling. Disorganized routing often reflects disorganized approach.
Specialty electrical shops focus on vehicle wiring and handle complex builds including EFI integration, modern gauge clusters, and custom accessory circuits. These shops often represent higher investment but deliver more sophisticated solutions.
Ask potential shops about their process: Do they remove the entire old harness or work around it? How do they document the new system for you? What’s their warranty on electrical work? How do they address troubleshooting if issues arise after you take possession? Answers to these questions indicate their professionalism.
What a Good Shop Provides
Professional installation should include more than running wires. A quality shop assesses your complete electrical needs—including current and future accessories—before recommending a specific kit or approach. They properly size circuits, include appropriate relays for high-draw components, plan adequate grounding points, and route everything to minimize interference and potential damage.
Documentation matters. A good shop provides a wiring diagram of what they installed, labeling of circuits at the fuse panel, and notes on any deviations from standard kit instructions. This documentation becomes valuable if you need to troubleshoot or modify the system later.
Warranty coverage varies but quality shops typically stand behind their work for at least a year. Understand what’s covered—parts, labor, or both—and what limitations apply. Electrical situations can be intermittent, so a shop willing to work with you on troubleshooting is valuable.
Communication During the Process
Good shops communicate progress regularly. You should receive updates when significant milestones are reached: old harness removed, new harness routed, initial testing completed, final verification done. Ask questions during the process—a shop that welcomes your curiosity is usually one that takes pride in their work.
Quality checkpoints matter. Ask if you can inspect the work at key stages. Seeing how they route and secure wires, how they handle connections, and how they organize the fuse panel area gives you confidence in the final result. Shops proud of their work welcome your interest.
Modern Upgrades to Consider During Rewire
If you’re replacing your wiring, it’s an ideal time to plan for modern upgrades you might want later. Adding these capabilities during the rewire costs less than retrofitting them afterward.
EFI Conversion Wiring
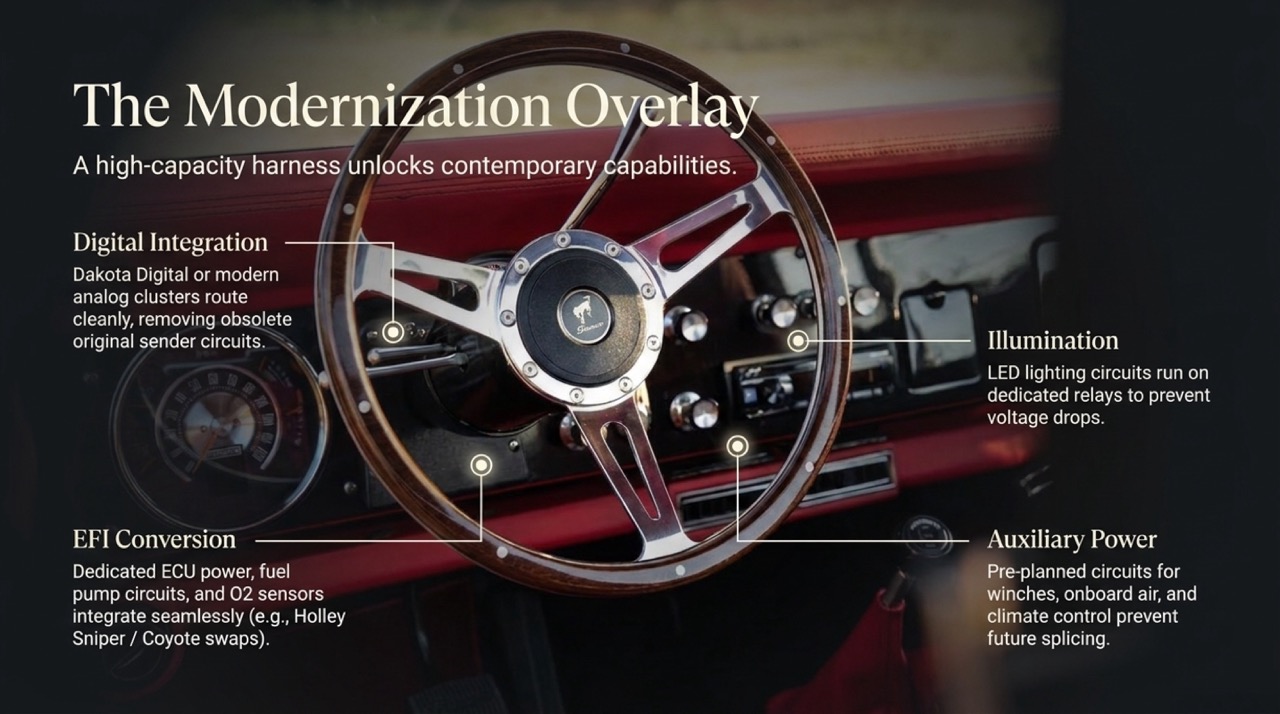
Electronic fuel injection is the most common powertrain upgrade for Early Broncos, and the wiring requirements are significant. Modern EFI systems require fuel pump circuits, ECU power and ground, oxygen sensor circuits, and often additional ignition system wiring. Planning these circuits during your rewire enables clean integration rather than adding an aftermarket harness alongside your new wiring.
Holley Sniper EFI systems are popular because they’re designed to replace carburetors with minimal additional wiring. Even these systems require properly sized fuel pump circuits and ECU power. More complex systems like factory 5.0L Coyote swaps require dedicated engine harnesses integrated with your vehicle wiring.
LED Lighting Circuits
LED headlights, driving lights, and interior lighting draw significantly less current than traditional bulbs, but they often require proper power regulation and can be sensitive to voltage drops. Planning separate circuits with appropriate relays ensures consistent performance. Some LED systems require dimming capabilities or specialized flasher modules for turn signals.
Modern Gauge Clusters
Factory Early Bronco gauges offer period charm but limited functionality. Modern digital or analog gauge clusters provide better accuracy, warning systems, and often integrate with modern engine management. Installing these during a rewire allows you to route sender wiring cleanly and potentially remove unnecessary original gauge circuits. Dakota Digital offers plug-and-play systems designed for vintage vehicles.
Auxiliary Circuits
Most Early Bronco owners add accessories over time: winches, onboard air compressors, auxiliary lighting, sound systems, phone charging, heated seats, or modern HVAC. Planning dedicated circuits for anticipated accessories means you’re not tapping into existing circuits later. Quality rewire kits include spare circuits for future expansion.
Charging System Upgrades
The original 40-amp alternator served a stock Bronco adequately but struggles with modern electrical loads. Upgrading to a 100-amp or higher alternator is common, and this upgrade requires appropriately sized wiring from the alternator to the battery and fuse panel. Planning this during rewire ensures proper gauge wire and protection.
Common Mistakes Buyers Make
Avoiding these considerations saves time and ensures a straightforward process. Every point below represents decisions that create complexity when based on immediate price rather than long-term value.
Choosing the Cheapest Kit Without Reviewing Compatibility
Budget wiring kits exist for $400-$500 less than quality options. The limitation becomes apparent during installation: instructions lack clarity, circuit diagrams don’t match the kit, wire colors don’t follow a logical scheme, and connectors require adaptation. You save on the front end but spend additional time working around the kit’s limitations. The most expensive kit is the one you replace because it doesn’t meet your needs.
Underestimating Complexity of Modern Accessories
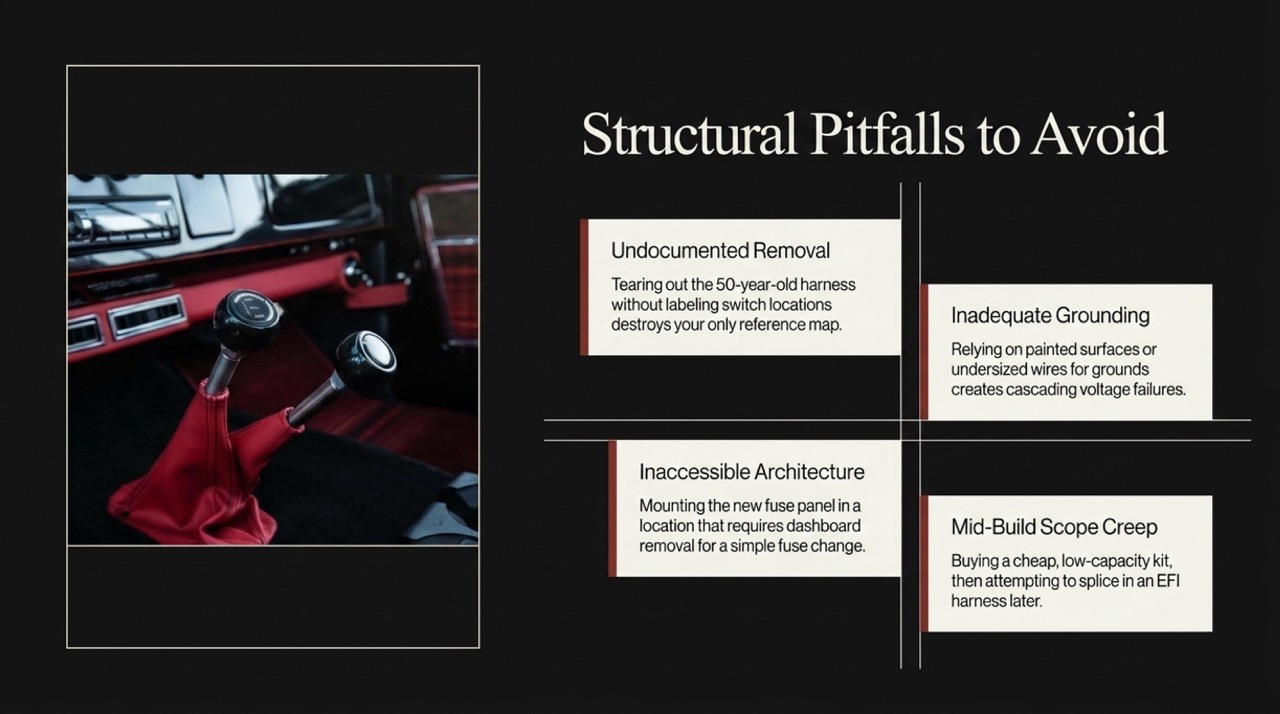
Many buyers plan a basic rewire, then decide mid-project to add EFI, modern gauges, and accessory circuits. The kit they selected doesn’t have sufficient circuits or proper fuse capacity. Adding an aftermarket accessory harness alongside your new main harness creates the kind of installation complexity you were trying to avoid. Plan for everything you might want before selecting your kit.
Not Documenting the Existing System Before Removal
When you remove fifty years of wiring, you’re removing a map of how everything works. If you don’t label which wire went to which switch, where grounds were located, and how the original routing worked, you’re working without reference during reinstallation. Taking photos and labeling connections before removal seems like additional work but saves time later.
Skipping Proper Grounding Systems
Voltage drops across inadequate grounds cause more electrical situations than almost anything else. Many DIY rewire projects focus on power wiring but treat grounds as secondary—scraping paint here, bolting there, assuming it works. A proper rewire includes planned grounding points with clean metal contact, adequate wire gauge, and protection from corrosion. Grounding deserves the same attention as power circuits.
Ignoring Fuse Panel Accessibility
Mounting the fuse panel somewhere convenient for installation but difficult to access later is a common oversight. When you need to change a fuse or troubleshoot a circuit, you want straightforward access without removing your dash or climbing under the vehicle. Accessible fuse panel location with reasonable protection from the elements matters for long-term usability.
ASC Early Bronco Wiring Standards: What Quality Means
Electrical systems either deliver reliability or they don’t. There’s no middle ground where “adequate” makes sense on a vehicle you depend on. At ASC 4×4, wiring standards reflect this reality—every circuit, connection, and routing decision serves reliability and serviceability.
OEM-Style Routing and Protection
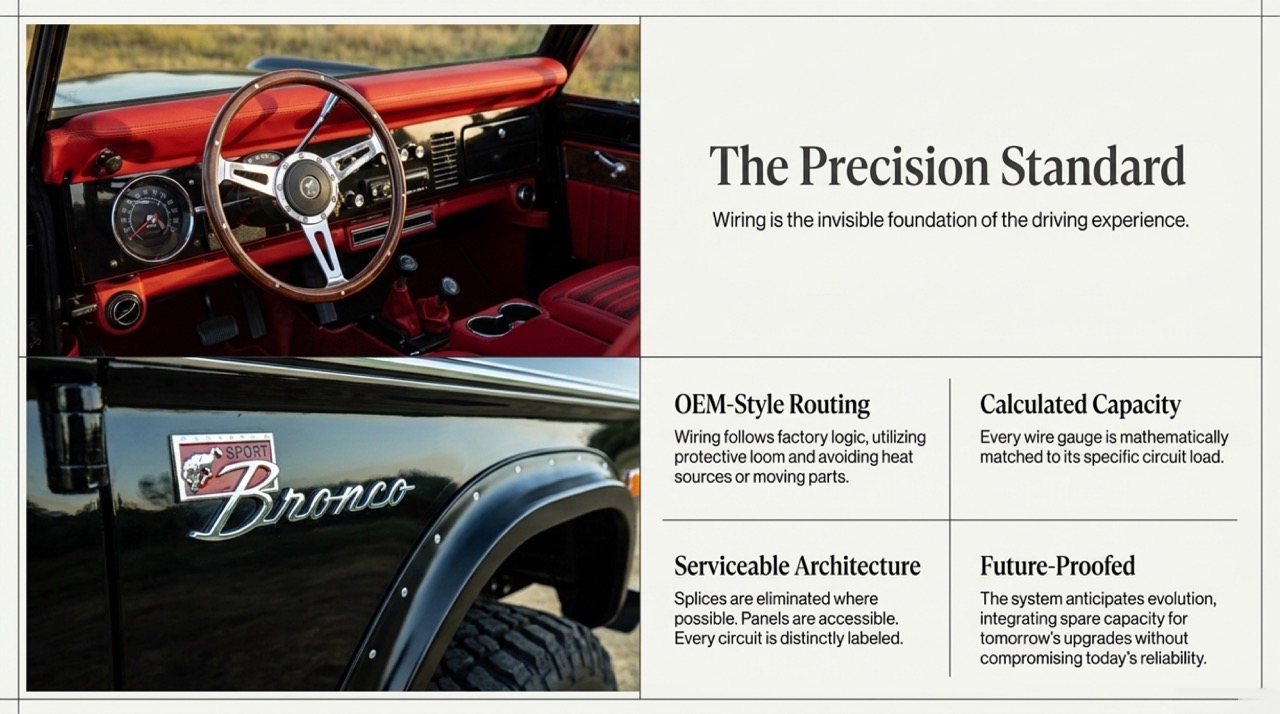
Factory engineers designed wire routing that avoids heat, moving parts, and potential damage points. Quality reproduction work respects this logic. Wires run through protective loom where appropriate, are secured at regular intervals to prevent chafing, and avoid sharp edges through body openings. Routing isn’t just about making it fit—it’s about creating a system that performs consistently.
Proper Gauge Selection for Each Circuit
Every circuit serves a specific purpose with known current requirements. Using oversized wire adds unnecessary cost and bulk; using undersized wire creates voltage drops and heat. Quality wiring matches wire gauge to circuit requirements, accounting for length and anticipated load. This isn’t estimation—it’s calculated based on actual needs.
Clean, Labeled, and Serviceable Connections
Every connection point should be accessible, identifiable, and maintainable. Splices are minimized, properly soldered, and protected. Connectors use appropriate terminals for the application. Fuse panel circuits are clearly labeled so you don’t need a schematic to locate which fuse protects your headlights. Someone unfamiliar with the vehicle should be able to look at the wiring and understand what they’re seeing.
Integration That Looks Factory-Installed
Aftermarket additions shouldn’t appear aftermarket. EFI harnesses integrate cleanly with the main system rather than being zip-tied alongside. Accessory circuits use proper switches and protection rather than toggle switches bolted to random surfaces. The overall appearance reflects thoughtful design rather than incremental additions. This isn’t about visual impact—it’s about work that reflects care and planning.
Future-Proofed for Planned Early Bronco Wiring Upgrades
Every owner eventually wants to add something. Quality wiring anticipates this by including spare capacity, accessible connection points, and documentation that makes future additions straightforward. You’re not working around the electrical system when you want to add a winch or lights—the system accommodates evolution.
Wiring isn’t the most visible part of an Early Bronco build, but it’s foundational. It’s the difference between a truck that starts consistently and drives reliably, and one that requires constant attention.
Early Bronco wiring decisions determine the ownership experience you’ll have. Electrical systems executed properly once deliver reliability that lets you focus on driving rather than diagnosing.
ASC 4×4 works with serious builds and consultations throughout Southern California, with remote coordination available for clients nationwide. When you’re ready for electrical systems that match your standards, let’s discuss your Early Bronco.
asc4x4.com | (310) 396-6341
Q: Can I drive my Early Bronco with the original wiring? A: Original wiring often functions if unmolested, but becomes less reliable as insulation ages and modern accessories are added.
Q: How long does a complete rewire take? A: DIY projects typically span 40-80 hours over weekends; professional installations usually complete in 1-2 weeks depending on shop schedule.
Q: Will a new wiring harness increase my Bronco’s value? A: Properly documented rewire work can enhance value, especially for buyers seeking reliability and safety.
Q: Do I need to remove the body for a rewire? A: Not necessarily, but frame-off restorations offer the best access. In-vehicle rewires are possible with patience.
Q: Can I keep my original switchgear with a new harness? A: Most quality kits work with original switches, though some upgrades may require modern replacements.
Q: What’s the difference between American Autowire and universal kits? A: Application-specific kits like American Autowire include factory-style routing and Early Bronco-specific circuits; universal kits require significant adaptation.
Q: Should I rewire before or after engine swap? A: Rewire after engine swap when possible, as you can integrate the new engine’s specific electrical requirements into the overall plan.
Sources
Cost of Wiring Harness Installation
Modern Engine Swaps into an Early Bronco
Comprehensive Guide to Diagnosing and Repairing Engine Wiring Harness Problems
Additional Reading
How Much Does It Really Cost to Restore an Early Bronco?
Frame Inspection & Body Mount Standards for 1966–77 Broncos
Restomod vs Restoration: Which Path Is Right for Your Early Bronco Build?